Anki-Freeplane Pro v1.4
Anki-Freeplane Pro is a plugin for the Anki flashcard system that converts Freeplane/Freemind (.mm) mind maps into Anki cards. This plugin is developed based on lajohnston/anki-freeplane (MIT) by aaa1386.
✨ Features
Card Syncing Automatically creates and updates cards based on Freeplane nodes. If a card is deleted in Freeplane, it will also be deleted in Anki. Excluded Paths: files or folders can be marked so that their cards will never be deleted in Anki (explained below).
File & Folder Support Import a single .mm file → Import Cards from Freeplane Import all .mm files in a folder (recursive) → Import Cards from Folder
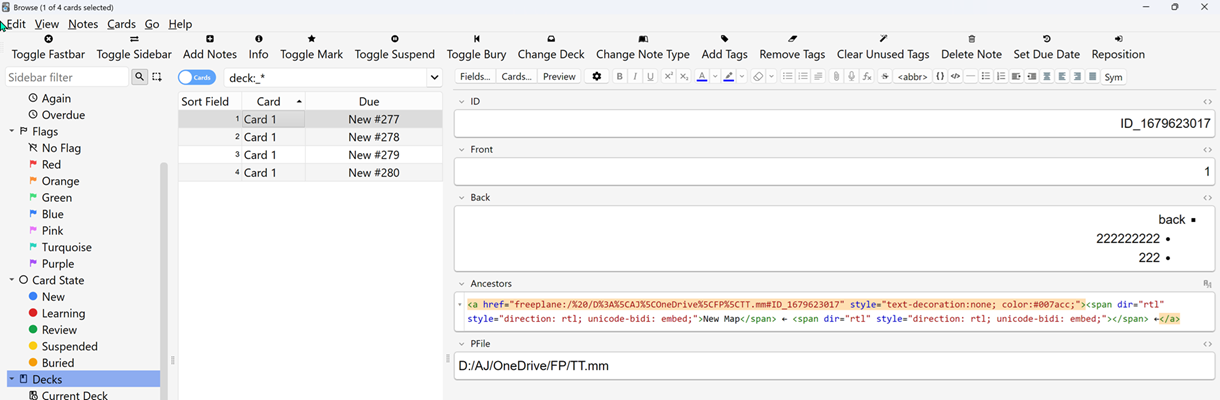
Ancestor Path Display Shows the ancestor path of each node. Helps visualize the exact position in the hierarchy.
Navigate to Node Click a node or its ancestor path in Anki to jump directly to the corresponding node in Freeplane.
Back Card Outliner (Configurable Levels) The back of cards can display child nodes in an outline format.
By default, outline depth is limited to 3 levels (to avoid infinite recursion).
Users can override this limit by adding an attribute back_levels to a node.
Example: back_levels = 5 → the outline will expand up to 5 child levels.
If back_levels is missing or invalid → default 3 levels will be used.
💻 Installation / How to Install
**Be sure to download the latest versions of both add-ons, anki-freeplane-pro and Anki-Freeplane-Cards, as many bugs have been fixed in these updates.
Step 1: Installing Anki-Freeplane Pro
From AnkiWeb
Go to Anki-Freeplane Pro on AnkiWeb. Search for Anki-Freeplane Pro. Follow the instructions on AnkiWeb to install the add-on directly into Anki.
From GitHub Release
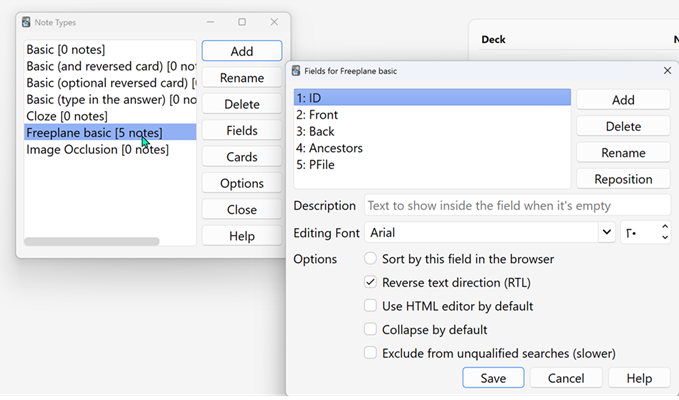
Go to GitHub repository. Download the latest release (zip file). Extract the zip file into Anki’s add-ons folder. Restart Anki to activate the plugin. Step 2: Creating a Note Type named “Freeplane basic” in Anki.
In the “Auxiliary files” folder, there is a file named node type.apkg. Import this file into Anki to create a note type called Freeplane basic.
Step 3: Creating Cards in Freeplane
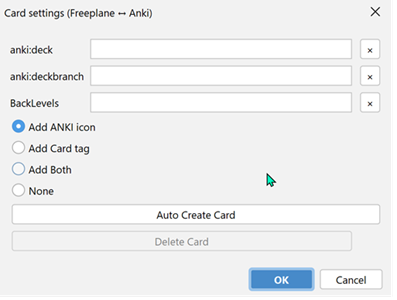
Card Creation Requirement: At least one of the fields anki:deck or anki:deckbranch must be present.
Method 1: Manually Right-click the node → Add Attribute Enter the field name (anki:deckbranch or anki:deck) Enter the corresponding value (anki:deckbranch or anki:deck) Method 2: Using the Script (https://github.com/aaa1386/Anki-Freeplane-Cards)
It is recommended to use this method, as it is very simple, provides multiple options for creating, editing, and deleting cards, and also supports automatic card creation.
This script creates flashcards for the Anki Freeplane Pro add-on.
Run the script in Freeplane. When executed, a window like the one below will appear:
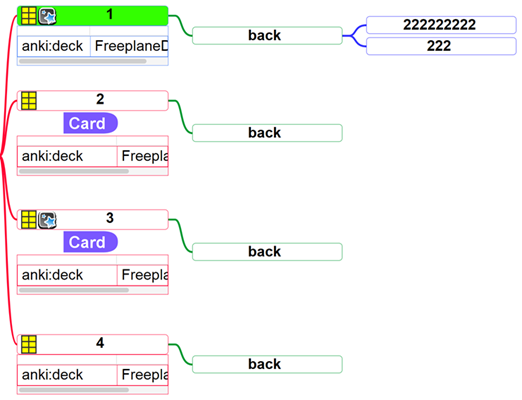
Assume the node QQ is selected:
The text of QQ will appear on the card.
The children of QQ will appear on the back of the card up to the number of levels set in the BackLevels field.
Using the anki:deck field, you can specify which deck in Anki the card should go to.
Example: if the value is AAA::BBB, the card will be added to the BBB deck under the AAA branch.
Field: anki:deckbranch Suppose its value is set to OOO and suppose the node QQ is selected:
All cards within the QQ subtree that meet the card creation conditions, along with the QQ node itself, will be added to the OOO deck (if the anki:deck field is not set, or if the card is created automatically).
This process continues until a new card with the anki:deckbranch field is created; from that point onward, all descendant nodes will automatically be assigned to the new parent deck. It is clear that if the user explicitly sets anki:deck, this manual setting takes precedence and the automatic assignment will be ignored.
Changing these fields ensures optimal updating of cards. If you run the script without filling any fields, pressing OK will automatically create cards, and the deck names will be assigned logically.
You can also automatically create cards using the “Auto Create Card” option.
If the BackLevels field is empty, by default three levels of children will appear on the back of the card، after importing the cards into Anki.
Radio Options:
Add ANKI icon Add Card tag Add Both None
These options determine how cards are displayed in Freeplane (icon, tag, both, or none). They only affect the display in Freeplane and do not impact Anki.
Step 4: Importing Cards from Freeplane to Anki
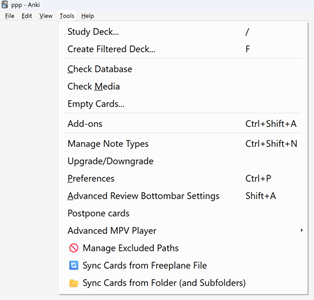
In the Tools menu in Anki, there are three options:
Sync Cards from Freeplane File → Import and sync a single .mm file
Cards that have been deleted in Freeplane or no longer meet the card creation criteria will be removed from Anki.
Sync Cards from Folder (and Subfolders) → Import and sync all .mm files in a folder
Cards that have been deleted in Freeplane or no longer meet the card creation criteria will be removed from Anki.
Manage Excluded Paths → Select paths and files to exclude from sync
If this option is enabled, cards from the selected file or folder will be imported, but deleted cards will not be removed from Anki.
Important Note:
If a card is created in a .mm file and you move it within the same file, it will not be deleted from Anki. Editing the fields of the card will not delete it; only the fields in Anki will be updated. This feature allows you to move and edit cards without losing their Due date in Anki.
After emporting:
The ancestor of the node that has been converted to a card is displayed in blue. Clicking on it will take you to that node in Freeplane.
These two add-ons have many features that cannot all be covered here.
Screenshots